How to Style Open Kitchen Shelving Without Looking Cluttered
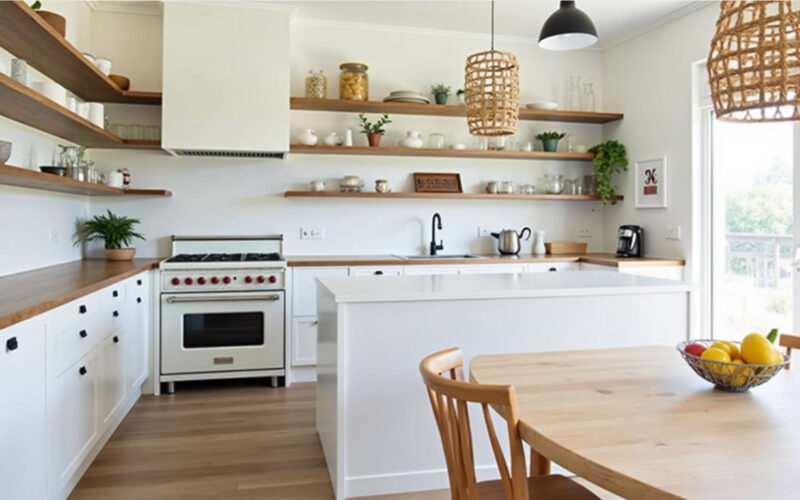
Open shelving in a kitchen offers a bright, airy aesthetic and quick access to daily essentials. However, without a clear styling strategy, open shelves can quickly become a catch-all for mismatched plastic containers, chaotic clutter, and dust.
To achieve that effortlessly chic, magazine-worthy look, interior designers rely on editing, color discipline, and intentional composition. Here is how to style your open kitchen shelves so they stay functional, beautiful, and completely clutter-free.
1. Stick to a Strict, Limited Color Palette
The secret to open shelving that looks cohesive rather than chaotic is color discipline. When items share a harmonious color family, your brain perceives them as a single organized collection rather than individual pieces of visual noise.
-
The Neutral Rule: Stick to a primary palette of 2 to 3 neutral shades (e.g., crisp white ceramics, warm natural wood, and clear glass).
-
Consistent Accent Tones: If you want to introduce color, choose one consistent accent shade—like sage green, matte black, or terracotta—and repeat it across multiple shelves to pull the look together.
┌────────────────────────────────────────────────────────────────────────┐
│                        OPEN SHELF COMPOSITION                          │
│                                                                        │
│   TOP SHELF          ┌──────────────┐     ┌──────────────┐             │
│   (Display / Decor)  │ Decorative   │     │ Small Plant /│             │
│                      │ Bowl / Pitcher│    │ Artwork      │             │
│                      └──────────────┘     └──────────────┘             │
│   ══════════════════════════════════════════════════════════════════   │
│   MIDDLE SHELF       ┌──────────────┐     ┌──────────────┐             │
│   (Mixed Everyday)   │ Stacked      │     │ Glass Jars w/│             │
│                      │ Bowls (3-4)  │     │ Dry Goods    │             │
│                      └──────────────┘     └──────────────┘             │
│   ══════════════════════════════════════════════════════════════════   │
│   BOTTOM SHELF       ┌──────────────┐     ┌──────────────┐             │
│   (High Utility)     │ Everyday     │     │ Coffee Mugs /│             │
│                      │ Dinner Plates│     │ Drinking Glasses           │
│                      └──────────────┘     └──────────────┘             │
└────────────────────────────────────────────────────────────────────────┘
2. Store Daily Essentials on the Bottom Shelf
Open shelving works best when form meets function. Items you use every single day won’t have time to collect dust, making the bottom shelf the ideal spot for your most-frequently reached-for dishware.
-
Bottom Shelf (Easy Reach): Stack your daily dinner plates, cereal bowls, and coffee mugs here.
-
Top Shelves (Display & Accent): Reserve higher shelves for secondary items like serving platters, decorative vases, cookbooks, or small framed prints.
3. Anchor with Uniform Stacks and Groups
Randomly scattered items look like leftover counter mess. Grouping similar objects into neat, intentional stacks creates clean horizontal and vertical lines.
-
Stack Dinnerware: Stack plates and bowls in groups of 4 to 6. Keep the stacks identical in color and shape.
-
Line Up Glassware: Arrange drinking glasses or wine stems in neat, straight grids rather than staggering them randomly.
-
Use Matching Glass Jars: Decant dry pantry staples—like pasta, rice, coffee beans, and oats—into clear glass canisters with wood or metal lids. Matching jars instantly turn ingredients into intentional decor.
4. Vary Heights, Shapes, and Textures
A shelf filled entirely with identical white plates can feel flat and sterile. To add visual interest without adding clutter, introduce subtle variations in height, material, and texture.
-
Mix Materials: Pair smooth white ceramics with raw wooden cutting boards, woven seagrass baskets, and clear glass.
-
Lean Vertical Items: Lean a beautiful wooden cutting board or marble prep slab against the back wall behind a stack of bowls. This acts as a backdrop that frames the shelf items and creates visual depth.
5. Embrace “Negative Space” (The 30% Rule)
The number one mistake homeowners make with open shelving is trying to fill every inch of available wood. Airflow and empty space are what make open shelves look light and expansive.
-
Leave 30% Empty: Aim to leave roughly 30% of each shelf empty.
-
Give Items Breathing Room: Leave at least 2 to 3 inches of blank space between different groupings on the same shelf. If items are touching from end to end, the shelf will immediately look crowded.
6. Hide Small Miscellany in Baskets
Not everything in your kitchen is camera-ready. Tea bags, vitamins, extra linens, and mismatched coffee scoops can ruin the clean aesthetic of open shelving.
-
Integrate small woven, wire, or wooden storage baskets on lower or upper shelves.
-
Baskets conceal visual clutter while adding rich, natural texture to the kitchen.
Open Shelving Styling Cheat Sheet
| Shelf Level | Primary Function | Ideal Items to Style |
| Bottom Shelf | Daily high-use items | Everyday dinner plates, bowls, drinking glasses |
| Middle Shelf | Mixed utility & storage | Clear glass pantry jars, stacked mugs, small cookbooks |
| Top Shelf | Visual anchors & decor | Pitchers, decorative bowls, potted trailing plants, framed art |
| Any Level | Clutter control | Small woven baskets for vitamins, tea, and small tools |